Monday, February 22, 2010

I love border punches!

I have been collecting border punches for a while and added a few to my tools this year when Martha Stewart came out with the "Punch Aroung the Page" sets.  I love to use these when making cards or doing a layout.  The extra detail and texture just adds to any project.  Here is a layout I just finished with photos from a visit we made to Virginia.  My sister-in-law has a beautiful farm in the Shenandoah Valley and I couldn't get enough of the country views.

I have been layering my punches recently and really like the effect.  In the layout above I put a bold blue under my border punch and made three layers of scallop punched strips in the center of this layout to make a nice break in the page.  It make take a little more work, but I do like to use regular border punches to make a frame.  The layout below I created from a Liz Qualman sketch.  I love her work!  This layout uses a wide Martha Stewart border "Trellis" punch and it made a frame that really stood out on the page. 
I had fun with this project because the punch had a wide enough spacing in the design to weave a ribbon through.  This added to the texture and color scheme of the layout. 

Read more...

Sunday, February 7, 2010

A Heart Swirl template for your Valentine photos!

I was considering what my next post might be to the "Ideas for Scrapbookers" blog and thought about Valentine's Day.  Since the holiday was so soon and I have a tender heart for this holiday I decided on creating a template with a heart.  I have special memories of Valentine's Day for a number of reasons.  I met my husband in February, and our second date was on Valentine's Day.  It wasn't one of those dates where everything turns out perfect, but it certainly showed me how considerate and easy going he could be.  The date didn't fall apart just because things didn't go as he had planned (we didn't get to eat at the fancy restaurant on the coast with the great view).  I had a great evening because he knew how to make the best of it, and make me feel special no matter where we ate dinner.  That's still true today! 

I am posting two examples of the template, one that is simplified and one that is a bit more complicated.  Here is the simple version.


This layout used just two pieces of the template, they run through the center of the page.  The template can be downloaded at http://ideasforscrapbookers.blogspot.com/

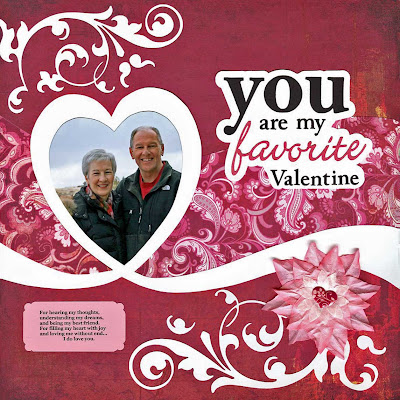
I used paper from the Basic Grey Bittersweet collections to prepare these layouts.  I loved the bright colors in this one.  Since I wanted to keep the first layout simple, I decided to adorn it with fancy flourishes.  This flourish is a Quickutz digital image that is available for purchase from their online store.  I cut the shape using my Klick-N-Kut ditigal craft cutter.  It would, of course, cut fine on a Silhouette too!  I decided to add a flower but didn't find anything in my supplies that was just the right color.  I have read a few posting lately about using coffee filters to make flowers.  I also watched a video of a segmet aired on Martha Stewart where a lady has been making lovely roses with coffee filters.  It got me curious enough to try one myself.  Well this is my first attempt at a coffee filter flower, it's kind of my own twist on the process which I have not yet perfected.  However it was fun to experiment and has great potential since the coffee filter paper is easy to paint, has good texture and will hold a shape once it has dried.  It actually looks a bit better in person.  I scan my layouts, so of course I squashed the flower to scan the layout.

My second layout uses all the pieces of the template.  I wanted to combine a full color photo with black and white photos to create more emphasis on the heart.


For this layout the shapes and picutres were the focus, so I kept the embellishments to a minimum.  I did try a new technique that I read in a nice tutorial at the Swirlydoos website.  The flourish embellishment in the upped left corner I made using 3D paint and clear craft plastic.  It was very easy and actually a lot of fun to do.  The tutorial I watched was located at: http://www.swirlydoos.com/page.php?46.  I found clear craft plastic at Michael's and it was not expensive at all.  They also sell the 3D paint.  The colors I used here are Watermellon and Candy Pink.  I then did my journaling in swirls to repeat the look of swirls on the page.  Most of my patterned paper shapes here have the edges distressed with Walnut ink to improve the contrast on the page.

Thanks for visiting.  Hope you have a lovely Valentine's Day!

Read more...

Thursday, February 4, 2010

I'm a contributing artist....it's exciting!

I am very excited to be joining the team of creative people at "Ideas for Scrapbookers" as a contributing artist. The group of ladies here are very talented and the website is packed with interesting scrapbook ideas. You can visit us here: http://ideasforscrapbookers.blogspot.com/

There are templates, tutorials, tips and tricks to make your pages stunning. There is a contest just starting for those of you who enjoy a good challenge. You'll need to lift one of the contributing artists and there are GREAT PRIZES. So come over and join the fun!

Read more...

Adding downloaded fonts to your computer

I have collected quite a few fonts because I love creating interesting titles on my layouts. From time to time I get asked how to add a downloaded font to a computer. It's not difficult so I am going to share here the steps. I have two computers, one is Windows XP and the other is Windows Vista. Since the steps are slightly different I am going to list both ways.

Windows Vista

1) I like to run a virus scan against any file I download from the internet, so I encourage you to do this if you have virus protection software on your computer.
2) Downloaded font files are generally .zip files and so the actual font files need to be extracted from the .zip file. On your computer, go to Start, then choose Computer. A window with all your computers drives and folders will open.
3) Navigate to the location of the .zip file that has your font. Right click on the file, you should see a small menu, choose "Extract All". The window will give you an option to save the contents in another location. If you don't choose another location the contents will be extracted to the same location that you saved the .zip file. Remember where this is because you will need to find this location to install the font.
4) Close or minimize the window that you have been working in. Then go to Start, then choose "Control Panel." When the window opens, click on the "Font" icon. You should see a list of all your fonts. Just right click in this area (somewhere in the white space, don't choose a font). A drop down menu should appear. Choose "Install New font" from the menu. A window will open. Here you will have to navigate to the folder where you saved the contents of your .zip file. When you are in the right location your font that is available to install will appear in the list portion of the window. When you see it, just highlight the font name and click the install button. That's it.

Windows XP

1) In Windows XP I like to work in the "Windows Explorer" window. To get there go to START, the choose PROGRAMS, then choose ACCESSORIES, and finally choose "Windows Explorer". This window will display all of your drives, folders and files. Navigate to the folder that is holding the .zip file you downloaded. Right click on the .zip file and a drop down menu appears. Choose "Extract All" from the menu. A wizard is going to open. In the first window click the NEXT button. Now the wizard will ask you where you want to put the extracted files. You can use the "browse" button to navigate to a different location if you wish. If you don't choose a different location the files will be extracted to the same location where your .zip file sits. Click the NEXT button and Windows will extract the files. Click FINISH and the wizard will close. Remember the location where the font files now sit. Now close or minimize Windows Explorer.
2) To install the font, go to START, then choose CONTROL PANEL. When the window opens double click the FONTS icon. A window will open and display all the fonts on your computer. Go to the menu bar along the top of the window. Choose FILE, then choose INSTALL NEW FONT. The "Add Fonts" window will open. In the lower half of the window you will need to navigate to the location where your font file sits. When you are in the right location the font name will appear in the upper half of the window in the "FONT LIST". There will be a check box at the bottom of the window that says "Copy fonts to Fonts Folder." Make sure the check box is CHECKED. Highlight the name of the font and click OK. The font should install and you should see an icon for it in the Fonts window.

Read more...

About This Blog

  © Blogger templates Newspaper III by Ourblogtemplates.com 2008

Back to TOP